Lab 1: Artemis and Bluetooth
Setting up the Artemis board and sending bluetooth data between the computer and the robot.
Lab 1A
Prelab
Prelab setup included updating the ArduinoIDE and installing the custom Sparkfun Apollo3 board definition for development with the Artemis.
1 Artemis Connection
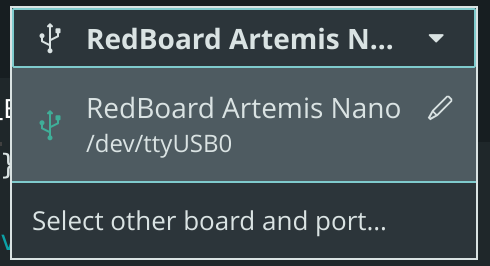
The Artemis board was connected to the computer via USB-C, and the Redboard Artemis Nano board and corresponding port were selected.
2 Blink
The Blink example code was compiled and uploaded. The resulting blinking LED on the Artemis is shown below.
3 Serial Monitor
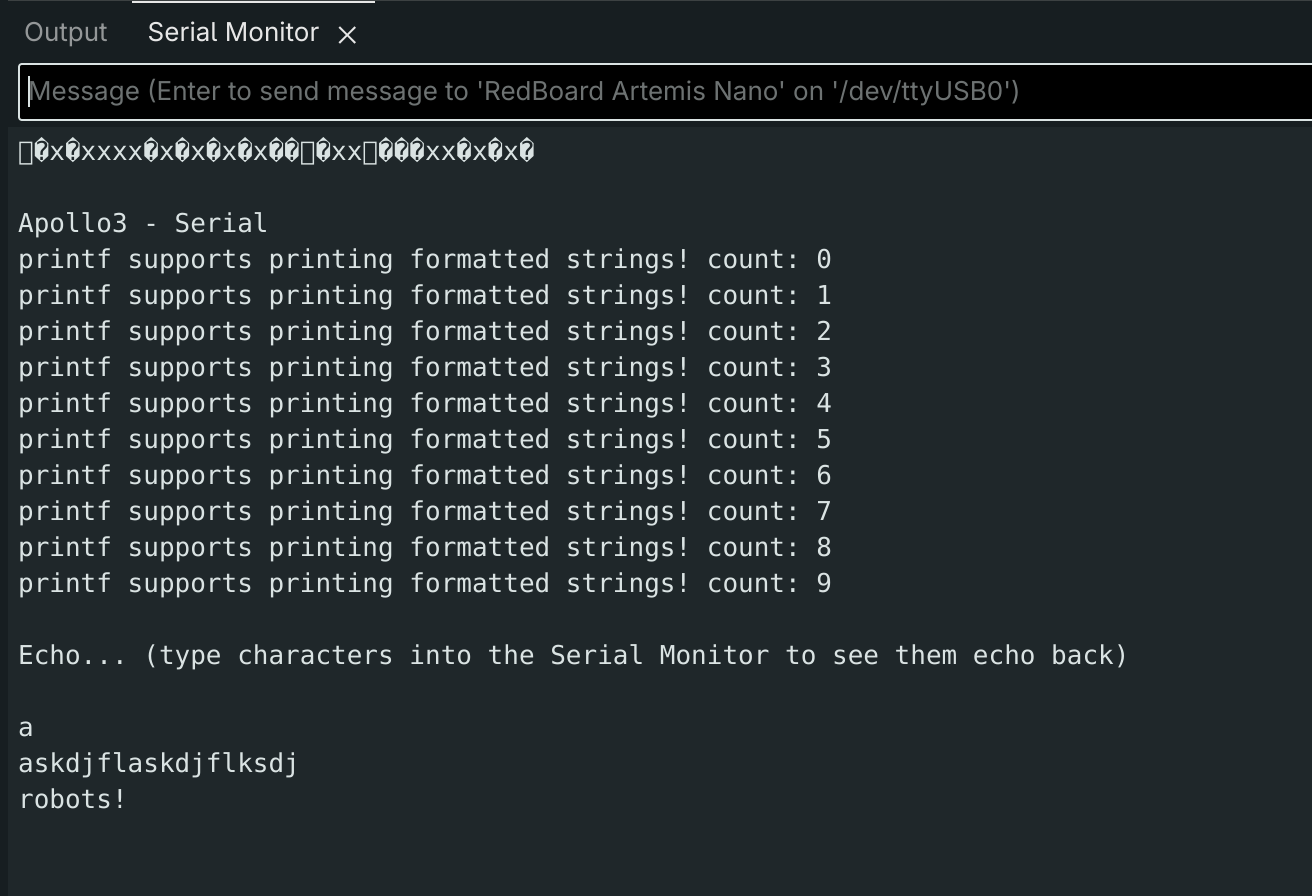
The Example4_Serial code was compiled and uploaded. The serial monitor's baud rate was set to 115000 to match the rate defined in the code. The example code serial writes 0-9 to demonstrate the support of printf. Additionally, the line:
Serial.write(Serial.read());commands the Serial Monitor to echo back typed messages, as shown below.
4 Temperature Sensor
The Example2_analogRead code was compiled and uploaded. The serial output is shown below, where blowing or pressing on the sensor caused the reading to jump.
5 Microphone
The Example1_MicrophoneOutput code was compiled and uploaded. I monitored the output of the loudest frequency, which jumped when I spoke into the Artemis or lightly tapped it against a surface.
Additional Task: Tuner
The previous Example1_MicrophoneOutput template was used as a base to create a simplified electronic tuner. My tuner detects three different octaves of A: A4 (440 Hz), A5 (880 Hz), and A6 (1760 Hz). The modified printLoudest function outputs to serial if a note is detected within the three defined frequencies (within a 10 hz error range).
double a4 = 440;
double a5 = 880;
double a6 = 1760;
double error = 10;

if (abs(ui32LoudestFrequency - a4) < error){
Serial.printf("Note found: A4!");
} else if (abs(ui32LoudestFrequency - a5) < error){
Serial.printf("Note found: A5!");
} else if (abs(ui32LoudestFrequency - a6) < error){
Serial.printf("Note found: A6!");
}

Serial.printf("\n");

}
This interactive table from muted.io was used to select and play specific frequencies.
Through testing, I found that the microphone could accurately detect frequencies until ~250 Hz, at which playing any lower frequency would output erroneously higher frequencies. Additionally, false positives due to noise occurred.
The video below demonstrates the successful detection of each of the three notes.
Lab 1B
Prelab
This section establishes Bluetooth Low Energy (BLE) communication between the Artemis and the computer. A virtual environment was set up and activated, where the Jupyter server was ran. Python 3.13.11 is used, and the following packages are installed:
pip install numpy pyyaml colorama nest_asyncio bleak jupyterlabThe provided codebase includes scripts for the Artemis (Arduino/C++) and the computer (Python).
In addition to the main Arduino script, there are three class definitions: for sending/receiving data; editing character arrays; and extracting command values sent by the computer.
The Python side includes; ble.py to define Bluetooth and data handling functions; a script to define command types sent to the robot; connections.yaml to define addresses and UUIDs; a script that formats logs and outputs to a directory. We also use a ipynb (Jupyter Notebook) to write commands, and send/receive Artemis data.
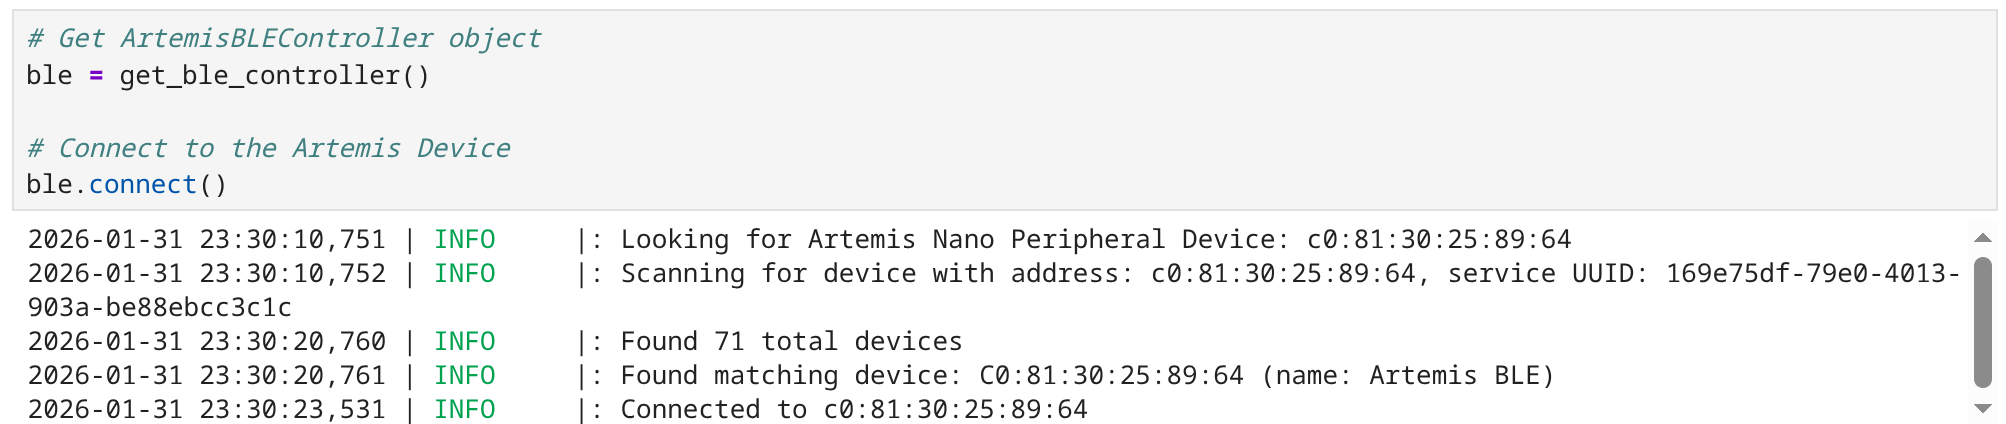
BLE communication follows a client-server model, where central devices (in this case, the computer) read or write data from a peripheral device (the Artemis board).
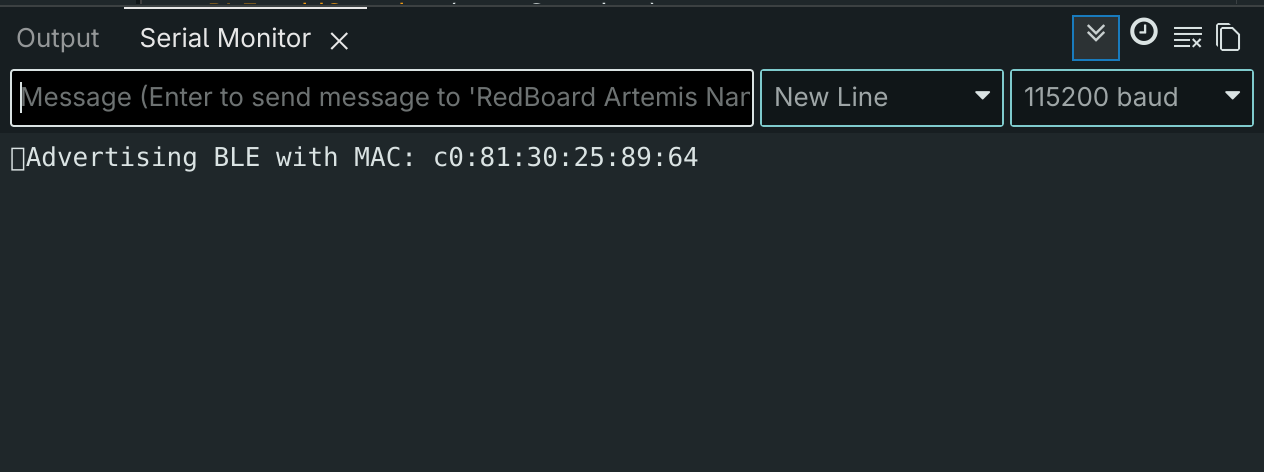
To establish connection between my specific Artemis board and the computer, the Artemis' MAC address and a randomly generated UUID are defined in the Python connections.yaml script. The UUID defined in the Arduino script must match. The Artemis advertises with its MAC address, and the computer connects by searching for the address and UUID.
1 Echo
The ECHO command in the Arduino code was modified to return the string send by the computer.
case ECHO:

      char char_arr[MAX_MSG_SIZE];

      // Extract the next value from the command string as a character array
      success = robot_cmd.get_next_value(char_arr);
      if (!success)
        return;

      tx_characteristic_string.writeValue(char_arr);

      break;
2 Send Three Floats
The SEND_THREE_FLOATS command was modified:
case SEND_THREE_FLOATS:
float int_c, int_d, int_e;
success = robot_cmd.get_next_value(int_c);
if (!success)
return;
success = robot_cmd.get_next_value(int_d);
if (!success)
return;
success = robot_cmd.get_next_value(int_e);
if (!success)
return;
Serial.print("Three Integers: ");
Serial.print(int_c);
Serial.print(", ");
Serial.print(int_d);
Serial.print(", ");
Serial.println(int_e);
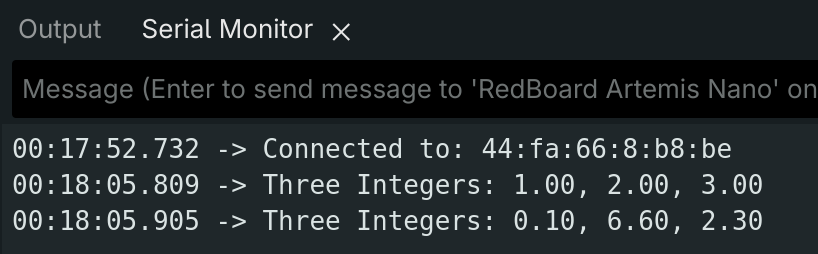
break;When running the following code cell in Jupyter, separating each command with "|":
ble.send_command(CMD.SEND_THREE_FLOATS, "1|2|3")
ble.send_command(CMD.SEND_THREE_FLOATS, "0|6|2")
The Artemis receives and outputs the floats:
3 Get Time
The built-in millis() function is utilized to keep track of the current program runtime.
case GET_TIME_MILLIS:

      unsigned long t;

      t = millis();

      tx_estring_value.clear();
      tx_estring_value.append("T:");
      tx_estring_value.append(String(t).c_str());
      tx_characteristic_string.writeValue(tx_estring_value.c_str());

      break;
4 Notification Handler
A notification handler is used to receive and extract the time from GET_TIME_MILLIS.
def notification_handler(uuid, byte_array):

    time = ble.bytearray_to_string(byte_array)
    extract = time[2:]
    print(extract)
When running the command, the extracted time is printed.
5 Data Transfer Rate
To find the rate messages are sent, the command is looped:
i = 0;

while i < 10:
    result = ble.send_command(CMD.GET_TIME_MILLIS, "")
    i += 1;
The following times are printed by the notification handler:
The average time between messages sent was ~97 ms, or 10 hz. Each 9-character message sends 10 bytes (1 per character, and \0), resulting in a data rate of ~100 bytes/second.
6 Sending Time
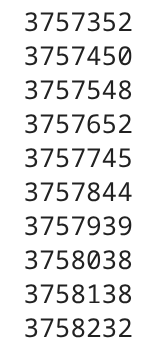
The maximum size of a characteristic value is 150 bytes. Leaving one byte for \0, 16 9-character messages can be sent in an array that stores time data.
The time and temperature arrays are initialized as global variables.
const int maxSize = 50;
unsigned long timeArray[maxSize];
unsigned long tempArray[maxSize];
A helper function make_arrays is used to fill these arrays.
void make_arrays() {

  unsigned long m;
  float temp;

  int currentSize = 0;

  int i = 0;
  while (i < maxSize) {
    m = millis();
    temp = getTempDegF();
    Serial.println(m);
    timeArray[i] = m;
    tempArray[i] = temp;
    i++;
  }
}
case SEND_TIME_DATA:
{
make_arrays();
for (int i = 0; i < maxSize; i++) {
tx_estring_value.clear();
tx_estring_value.append("T:");
tx_estring_value.append(String(timeArray[i]).c_str());
tx_characteristic_string.writeValue(tx_estring_value.c_str());
}
break;
}The notification handler stores received values in an array. All 50 values are printed:
7 Sending Temperature
A similar command is written to send both time and temperature:
case GET_TEMP_READINGS:
{
make_arrays();
for (int i = 0; i < maxSize; i++) {
tx_estring_value.clear();
tx_estring_value.append("T:");
tx_estring_value.append(String(timeArray[i]).c_str());
tx_estring_value.append("; ");
tx_estring_value.append(String(tempArray[i]).c_str());
tx_characteristic_string.writeValue(tx_estring_value.c_str());
}
break;
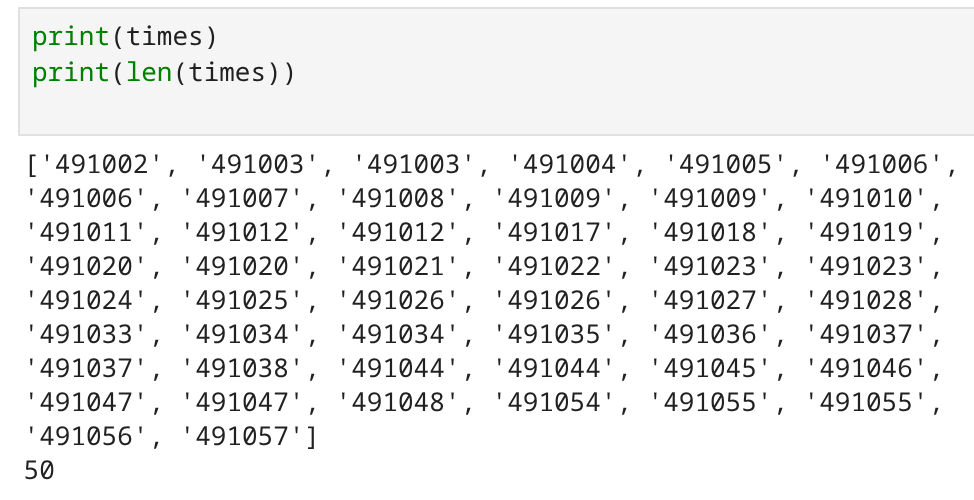
}times = [];
temps = [];
def notification_handler(uuid, byte_array):
result = ble.bytearray_to_string(byte_array)
extract = result.split(";")
t1 = extract[0][2:]
t2 = extract[1]
times.append(t1)
temps.append(t2)
8 Method Comparison
Comparing the message transfer methods in Part 5 vs. 6/7, the first method is much slower as it must wait to receive data before sending each separate command. However, it could be used in closed-loop cases, where the commands are sent depending on the received data. In method 2, it takes ~1.06 ms between each message, and is therefore useful in open-loop cases. The IDE output shows that "Global variables use 30552 bytes (7%) of dynamic memory", leaving 353448 bytes. If each time + temperature message takes 13 bytes, then ~27000 data points of each can be stored.
Additional Task: Effective Data Rate and Overhead
To determine if the size of messages affect overhead, a command that echoes back the varying message sizes sent from the computer was written.
 case MESSAGE:
      {
        int t;
        t = millis() % 1000;

        char char_arr[MAX_MSG_SIZE];

        success = robot_cmd.get_next_value(char_arr);

        tx_estring_value.clear();
        tx_estring_value.append(String(t).c_str());
        tx_estring_value.append(";");
        tx_estring_value.append(char_arr);

        tx_characteristic_string.writeValue(tx_estring_value.c_str());

        break;
      }
def notification_handler(uuid, byte_array):
m = ble.bytearray_to_string(byte_array)
print(m)
t = m.split(";")[0]
times.append(t)
s = len(m)
sizes.append(s)The differences between two consecutive commands were calculated normalized to match the 120 byte size (ex. the 5-byte message rate was multiplied by 24) and the plotted results are shown below. We can conclude that sending one large message is more efficient than many small messages.
message_size = [];
rate = [];

i = 0
while i < len(sizes):
    normalize = 120/sizes[i]
    message_size.append(sizes[i])
    rate.append(normalize*((int(times[i + 1]) - int(times[i]))))
    i += 2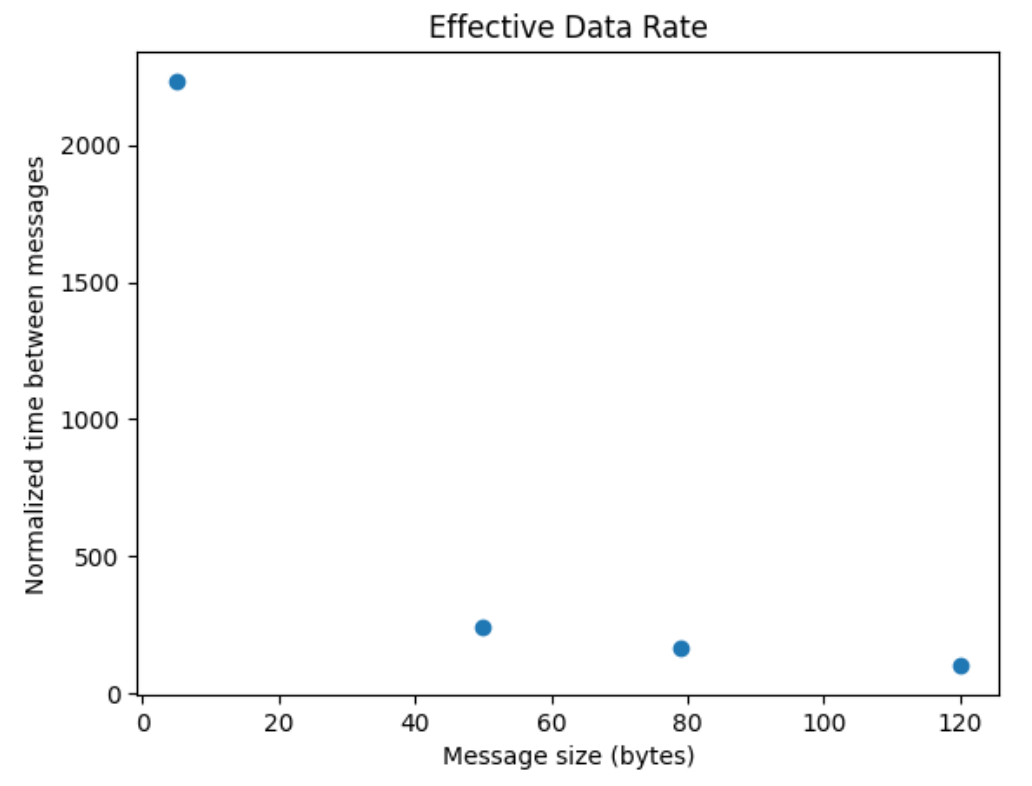
Additional Task: Reliability
To test whether the computer can read all data published at high rates, a new command is written to send messages in the magnitude of microseconds.
case FAST:
      {
        int rate;
        success = robot_cmd.get_next_value(rate);
        if (!success)
          return;

        int i = 0;
        while (i < 100) {
          delayMicroseconds(rate);
          tx_estring_value.clear();
          tx_estring_value.append(String(i).c_str());
          tx_characteristic_string.writeValue(tx_estring_value.c_str());
          i++;
        }
        break;
      }
When calling the command:
messages = [];
def notification_handler(uuid, byte_array):
    m = ble.bytearray_to_string(byte_array)
    messages.append(m)

ble.send_command(CMD.FAST, 1)
We print the data and see that every iteration is succesfully received.
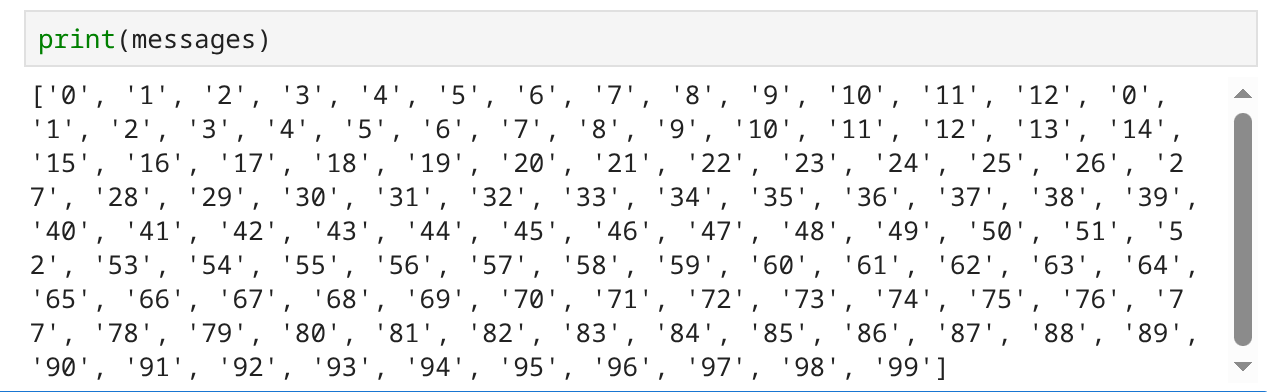
However, the message array visually takes ~2 seconds to fill, suggesting that data rate is slower than the commanded 1 microsecond and is therefore limited by the Artemis.